How to add Zendesk Chat to your website via Script/Zendesk Plugin
How to add Zendesk Chat to your website
We all use different tools to increase the audience and engagement on our website. We keep on finding tools to give the best experience to the visitors that connect with our website. We do so because we want to improve the overall user experience on our website. If they visit once they should wish to come again and again. One such thing that will really enhance the user experience and query issue of your blog or website is the Zendesk Chat option. In this post, we will teach you How to add Zendesk Chat to your website using Zendesk Chat live script/embed code. We also tell you How to add Zendesk Chat to your website using Zendesk Plugin.
The Zendesk plugin makes the task easier for those who do not have much knowledge of the coding and programming. The Zendesk live chat script if not added at the right place, can cause issues to the website. So, if you do not have any idea about how to add Zendesk live chat script/ embed code you should go for the Zendesk live chat Plugin. First, we will teach you How to add Zendesk Chat to your website via live chat Script/embed code. After that, you will learn, How to add Zendesk Chat to your website using the Zendesk Live Chat Plugin.
Also see: Download or Update Facebook Chat messenger for Free
Also Check: Google Allo Chat app, Chat with school/college friends and relatives
How to add Zendesk Chat to your website via Zendesk Chat Script
Before you start serving/ chatting with your visitors on your website let us see How to add the widget to your site using Zendesk live chat embedded code or simply speaking How to add Zendesk Chat to your website via Script/embed code.
Steps to add Zendesk live chat embed code/script using HTML editor
- Go to Dashboard==>Settings==> Widget ==> Getting Started Tab
- Then you will need to copy the given below script and then embed the live Chat Script /embed code into your website.
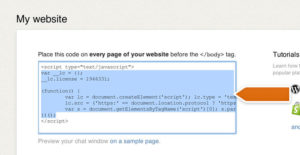
You can find the Script here
3. Enter into the website editor section of your website.
4. Then look for the section where you can edit the HTML of your website.
5. You will search for the header tags as this Zendesk live chat script will go there only. (<head> and </head> tags)
6. Then Paste copied Live chat script above between the header tags. You can paste it just after the <head> tag or right before the </head> tag according to your choice.
6. Do not paste it elsewhere
7.Click on
Save and Publish Your changes.
8.After clicking you need to refresh the website and you will definitely see your Zendesk
Live chat widget.
9. If the Zendesk Chat widget is Visible then it’s Ok otherwise you have done some error in pasting the code.
Now we will see How to add Zendesk Chat to your website using the Zopim Zendesk Chat Plugin.
How to add Zendesk Chat to your website using Zendesk Chat Plugin by Zopim

Now you have learned How to add Zendesk Chat to your website using Zendesk Chat live script or embed code. We told you to paste the Zendesk Chat Live script or embed code into the HTML editor of your website but if you are facing any problem in adding Zendesk Live chat widget to your blog/website then don’t worry we have the alternate option for you. You can go for the Zendesk Chat Plugin available in WordPress.
The Zendesk plugin is designed by Zopim. Now have a look on How to add Zendesk Chat to your website using the Zendesk Chat plugin.
How to add Zendesk Chat to your website using Zendesk Plugin: STEPS
- Open the Dashboard of your blog or website.
- Then go to Plugins Section==> Add New
- Search for Zendesk Chat Plugin by Zopim
- Click on the Install button for the Zopim Zendesk Chat plugin.
- Then click on the Zendesk Chat Plugin Activate button.
- Then Zendesk Chat Plugin will be activated and will take you to the Dashboard of Zopim Zendesk Chat.
- Setup your Zendesk Chat Account by adding your username/email and add a password.
- You are done!
- Login after adding you username and password(same you used while signing up for the Zendesk Chat Account)
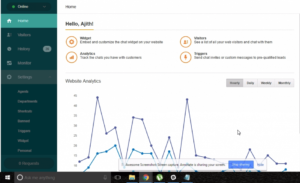
- You will see the Zendesk Chat Dashboard and you can view the online visitor at that time.
- Enjoy the Live Chat with your visitors and keep them happy by answering their queries. 🙂 🙂
Uses or Features of the Zopim Zendesk Chat widget

In this section, we will tell you Why you need Zendesk chat feature to your website or blog. Adding a live chat feature to your website or blog is very important as it let you track and monitor the behavior of your website/blog visitors. You can communicate with them in the real time, answer their queries, listen to them.
Zopim Zendesk Chat plugin helps to connect with the customer in real time. You can monitor the activities and track the chats of your visitors too. You can provide live support to your customers if you have an online business.
When you chat with your visitors at least one of the members out of your team should always be online so that the visitors can enjoy the live chat feature or they will need to leave a message. Some users prefer live real time chat instead of leaving a message and waiting for the reply. They hate it! It can have a bad impression of your website or company. So we have the solution
Also see: Chat with Strangers around the World, Download Kik app
How to always Stay Online for Live Zendesk Chat/Queries
In this section, we will tell you how you can show your live chat option always online so that user can get the fastest response to their questions in real time.
- Go to Google PlayStore on your android device
- Search for Zopim Zendesk Chat App.
- After you find the Zendesk Chat app on Google Playstore, Install the app.
- Wait for the installation.
- After you install the Zendesk live Chat app on mobile then login with the username and password you used in the Zendesk Chat Account Signup.
- If you forgot the password for Zendesk Chat account of Zopim you can you can make use of the Forgot Password option.
DOWNLOAD ZOPIM ZENDESK CHAT APP ON GOOGLE PLAYSTORE
Download Zopim Zendesk Chat App on iPhone
